How to upload zip file on blogger ?


Monday, October 26, 2009

Answer :

you can't upload any file directly to your blog.but you can achive this by indirectly, Please

read to find simple and free method to upload zip file on blogger.


Create account in this site :

http://www.4shared.com/signup.jsp


Just enter your email address and click on signup with FREE account

Then a virtual directory will be appered in front of you

http://www.4shared.com/account/dir/22327988/fd9c2607/sharing.html?rnd=46


Below you can see, upload file option, you can use that and upload your zip,image or any file
which you wanted, the user should download from your blog.

After uploading that file, you will see that file will appeared in the virtual directory.
then to get download link, you just click on download icon shown at the end of your file in

that virtual directory.

After clicking on that link, you will find this page

http://www.4shared.com/file/143676923/93c0c852/paypal_credit_card_processing_payment_gateway.html?signout=1


click on download, dont worry, the download will not start, this is to get download link.

after clicking on download button, you will see this page, counting download time in

decremently..

http://www.4shared.com/get/143676923/93c0c852/paypal_credit_card_processing_payment_gateway.html


then right click on this link "Click here to download this file" and click on "copy link

location".

open notepad and paste copied link.

i.e copied link ->


http://dc170.4shared.com/download/143676923/93c0c852/paypal_credit_card_processing_payment_gateway.zip?tsid=20091026-010849-1eccccca


How to use this download link in your blog

use this HTML code in your blog

<a id="downloadid" src="http://dc170.4shared.com/download/143676923/93c0c852/paypal_credit_card_processing_payment_gateway.zip?tsid=20091026-010849-1eccccca" >Download Source Code</a>


when the user will click on this download link, the download will start from your blog without

visiting to other site.

Click here to see Demo


Hope this post will help you,
if yes please put comment below of this page,
Rajesh Singh,
Asp.Net Developer
Indianic Infotech Ltd (India)
rajesh@indianic.com

Drawing Line graph in Asp.Net


Thursday, October 22, 2009


1) Run VS.NET

Click on "Start->Programs->VS.NET->VS.NET".
2) Create a new ASP.NET WebSite

Click the menu "File->New->Project"

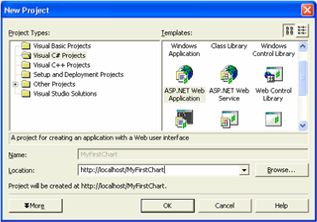
In the "New Project" Dialog select the language of your choice.

For now lets just select "Visual C# Projects" in the Project Types treeview and select "ASP.NET Web Application" in the Templates list.

Specify a name for it. The dialog should look like the following image.

Click OK.


3) Add the WebChart control to the toolbox

NOTE : Before moving ahead, you will need to download WebChart.dll. Download

This is an optional step, but it makes life easier if you plan on using the control on more than one project, since it will no longer require you to add references, nor copy the control, etc.
While in the WebForms Designer. Select the option menu "View->Toolbox".

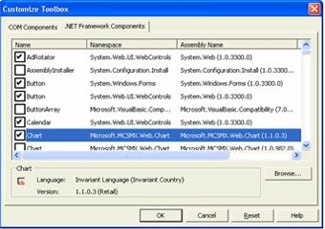
Right click on it and select the option Customize Toolbox.

Once in the "Customize Toolbox" Dialog, select the “.NET Framework Components” Tab. Click the Browse button.

And look for the file WebChart.dll. Click Ok. The dialog should look as follows. Click Ok.


4) Add a Chart to the WebForm

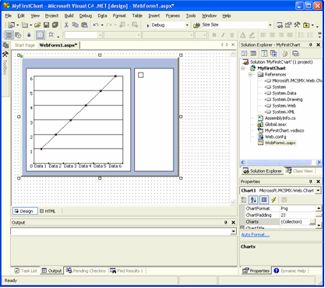
To Add a Chart to the WebForm, you can just Drag a Chart control (added in the previous step to the toolbox, look for the small chart glyph) .


5) Add some formatting to the chart

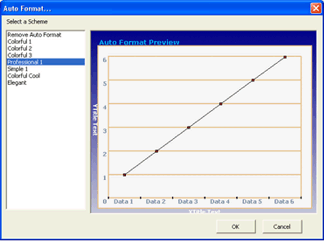
You can add easily formatting to your chart by right clicking on it and
selecting the option “Auto format…” or from the Property Grid.


6) Add a Chart to the control

You can add the charts either from code or from design time. It is easier to do in design time, since
doing this way, you can actually get a WYSIWYG version of the control without even having to run it.

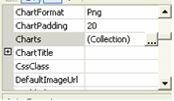
To add a chart in Design Time, just double click the Charts… Property in the Property Window.


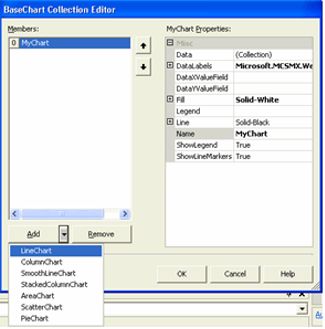
This will launch the Chart Editor, where you can add any type of Chart (LineChart, ColumnChart, etc)
by choosing the drop down button at the bottom of the dialog and configure all their properties.

So for now, Add a LineChart and assign it a Name of “MyChart”, and click Ok.


7) Add code to add points and render the chart

Double click on the Designer to take you to the Page_Load event of your page.

Add a using statement at the top of the page code to avoid writing the namespace in all your declarations.

using System;
using System.Collections;
// Other namespaces...
using WebChart;
Now add some code to add the points to the chart.
All points in the Chart are represented with the ChartPointclass. So in the code below we first grab a reference to the Chart already in the control (since it was added in design time), and then use its Data property to add the Points.

Note that you need to cast the chart to the correct type of chart, since it returns a Chart class that is the base class for all charts.

At the end we call RedrawChart method that creates the file.

THIS IS REALLY IMPORTANT, every time you want the control to redraw the chart, you need to explicitly call this method, if you fail to do so, it will not create the image file.

private void Page_Load(object sender, System.EventArgs e) {

LineChart chart =(LineChart)ChartControl1.Charts.FindChart("MyChart");
chart.Data.Add( new ChartPoint("Jan",10) );
chart.Data.Add( new ChartPoint("Feb", 20) );
chart.Data.Add( new ChartPoint("Mar",30) );

ChartControl1.RedrawChart();
If you don’t add the charts in design time you can also add them by code like this:

private void Page_Load(object sender, System.EventArgs e) {

LineChart chart = new LineChart();
chart.Data.Add( new ChartPoint("Jan", 10) );
chart.Data.Add( new ChartPoint("Feb", 20) );
chart.Data.Add( new ChartPoint("Mar", 30) );
ChartControl1.Charts.Add(chart);

ChartControl1.RedrawChart();
Notice that you will need to add it to the Charts collection of the control.
8) Compile and Run the page.


Hope this post will help you,
if yes please put comment below of this page,
Rajesh Singh,
Asp.Net Developer
Indianic Infotech Ltd (India)
rajesh@indianic.com
List of Test Credit Card Numbers


credit cards images

Card Type

Card Number

American Express

378282246310005

American Express

371449635398431

American Express Corporate

378734493671000

Australian BankCard

5610591081018250

Diners Club

30569309025904

Diners Club

38520000023237

Discover

6011111111111117

Discover

6011000990139424

JCB

3530111333300000

JCB

3566002020360505

MasterCard

5555555555554444

MasterCard

5105105105105100

Visa

4111111111111111

Visa

4012888888881881

Visa

4222222222222

Note : Even though this number has a different character count than the other test numbers, it is the correct and functional number.

Processor-specific Cards

Dankort (PBS)

76009244561

Dankort (PBS)

5019717010103742

Switch/Solo (Paymentech)

6331101999990016


Hope this post will help you,
if yes please put comment below of this page,
Rajesh Singh,
Asp.Net Developer
Indianic Infotech Ltd (India)
rajesh@indianic.com

Register User Controls and Custom Controls in Web.config


Thursday, October 15, 2009

Problem with declaring usercontrols in all page

<%@ Register TagPrefix="rajesh" TagName="Header" Src="UserControls/Header.ascx" %>
<%@ Register TagPrefix="rajesh" TagName="Footer" Src="UserControls/Footer.ascx" %>
<%@ Register TagPrefix="Control1" Assembly="Control1" %>

<html>
<body>
<form id="form1" runat="server">
<rajesh:Header ID="rajeshHeader" runat="server" />
</form>
</body>
</html>


This works fine, but suppose you have so many user control and you are using them in all pages by simply dragging and dropping .

so if at some time ,you have changed the path of user control .

then you need to change the path of user control in all pages in which you have used user control.

Solution to the problem discussed above

The above situation might not have occurred if you have registered the user control in web.congif file.

Instead of declaring and duplicating in all pages, its better to declare once in web.config file and use as many time you want to use in your page.

<?xml version="1.0"?>

<configuration>

<system.web>

<pages>
<controls>
<add tagPrefix="rajesh" src="~/UserControls/Header.ascx" tagName="header"/>
<add tagPrefix="rajesh" src="~/UserControls/Footer.ascx" tagName="footer"/>
<add tagPrefix="Control1" assembly="Control1"/>
</controls>
</pages>

</system.web>

</configuration>


Once you declare the UserControls within the web.config file, you can then just use the controls on any page.

<html>
<body>
<form id="form1" runat="server">
<rajesh:header ID="rajeshHeader" runat="server" />
</form>
</body>
</html>


Hope this post will help you,
if yes please put comment below of this page,
Rajesh Singh,
Asp.Net Developer
Indianic Infotech Ltd (India)
rajesh@indianic.com
Differenc between "And" and "AndAlso" Operator in Asp.Net


The 'And' operator evaluate both side, where 'AndAlso' only evaluate the right side if the left side is true.

See below examples to find difference between And and AndAlso.

Example 1:


If mystring IsNot Nothing And mystring.Contains("Rajesh") Then
' And operator evaluate both side
End If

This throws an exception if mystring = Nothing

If mystring IsNot Nothing AndAlso mystring.Contains("Rajesh") Then
' AndAlso only evaluate the right side if the left side is true
End If

This will not throws an exception.


Please see second example to make you more clear to find difference between And and AndAlso,


The "And" operator will check all conditions in the statement before continuing, whereas the Andalso operator will stop if it knows the condition is false.

Example 2:

if x = 8 And y = 9

Checks if x is equal to 8, and if y is equal to 9, then continues if both are true.

if x = 8 Andalso y = 9

Checks if x is equal to 8. If it's not, it doesn't check if y is 9, because it knows that the condition is false already.


Hope this post will help you,
if yes please put comment below of this page,
Rajesh Singh,
Asp.Net Developer
Indianic Infotech Ltd (India)
rajesh@indianic.com
Explaination of flow of Authorize.net Payment Gateway


Wednesday, October 14, 2009

In this post, I have explained you step by step implementation of authorize.net payment gateway integration in your website and explained you what happen behind the screen in payment gateway processing.


Explanation of Step 1


Step 1: The merchant submits a credit card transaction to the Authorize.Net Payment
Gateway on behalf of a customer via secure Web site connection, retail store, MOTO
center or wireless device.


Explanation of Step 2


Step 2: Authorize.Net receives the secure transaction information and passes it via a secure connection to the Merchant Bank's Processor.


Explanation of Step 3


Step 3: The Merchant Bank's Processor submits the transaction to the Credit Card Network (a system of financial entities that communicate to manage the processing, clearing, and settlement of credit card transactions).


Explanation of Step 4


Step 4: The Credit Card Network routes the transaction to the Customer's Credit Card Issuing Bank

Explanation of Step 5

Step 5: The Customer's Credit Card Issuing Bank approves or declines the transaction based on the customer's available funds and passes the transaction results back to the Credit Card Network.


Explanation of Step 6


Step 6: The Credit Card Network relays the transaction results to the Merchant Bank's Processor.

Explanation of Step 7


Step 7: The Merchant Bank's Processor relays the transaction results to Authorize.Net.


Explanation of Step 8


Step 8: Authorize.Net stores the transaction results and sends them to the customer and/or the merchant. This step completes the authorization process – all in about three seconds or less!


Explanation of Step 9


Step 9: The Customer's Credit Card Issuing Bank sends the appropriate funds for the transaction to the Credit Card Network, which passes the funds to the Merchant's Bank. The bank then deposits the funds into the merchant's bank account. This step is known as the settlement process and typically the transaction funds are deposited into your primary bank account within two to four business days.


Hope this post has helped you,
If yes, Please put a comment below to encourage us.
Thank you

Rajesh Singh,
Indianic Infotech Ltd
rajesh@indianic.com

Count Number Of Stored Procedures, Views, Tables and Functions using Query


Saturday, October 10, 2009

Hi friends ,

Sometimes you may need to count number of table in your database and if your database have hundreds of table then it is almost impossible to count tables in your database.

So here is the small query, using which you can count Stored procedure you have used ,table you have made, views you may have created.

/* Count Number Of Tables In A Database */
SELECT COUNT(*) AS TABLE_COUNT FROM INFORMATION_SCHEMA.TABLES
WHERE TABLE_TYPE=‘BASE TABLE’

/* Count Number Of Views In A Database */
SELECT COUNT(*) AS VIEW_COUNT FROM INFORMATION_SCHEMA.VIEWS

/* Count Number Of Stored Procedures In A Database */
SELECT COUNT(*) AS PROCEDURE_COUNT FROM INFORMATION_SCHEMA.ROUTINES WHERE ROUTINE_TYPE = ‘PROCEDURE’

/* Count Number Of Functions In A Database */
SELECT COUNT(*) AS FUNCTION_COUNT FROM INFORMATION_SCHEMA.ROUTINES WHERE ROUTINE_TYPE = ‘FUNCTION’


The same methodology can be used to query for information :

/* Select Table Information For A Database */
SELECT * FROM INFORMATION_SCHEMA.TABLES WHERE TABLE_TYPE=‘BASE TABLE’

/* Select View Information For A Database */
SELECT * FROM INFORMATION_SCHEMA.VIEWS

/* Select Stored Procedure Information For A Database */
SELECT * FROM INFORMATION_SCHEMA.ROUTINES WHERE ROUTINE_TYPE = ‘PROCEDURE’

/* Select Function Information For A Database */
SELECT * FROM INFORMATION_SCHEMA.ROUTINES WHERE ROUTINE_TYPE = ‘FUNCTION’

Hope this post will help you,
if yes please put comment below of this page,
Rajesh Singh,
Asp.Net Developer
Indianic Infotech Ltd (India)
rajesh@indianic.com
Retrive data from database using Stored procedure and class file in Asp.Net


Thursday, October 8, 2009

Step1: Create SP in database

-- =============================================

-- Author: rajesh

-- Create date: 6th Nov 2008

-- Description: this SP is to find the keyword used to do search.

-- =============================================

IF EXISTS (SELECT * FROM sysobjects WHERE id = object_id('JAU_SP_Getkeyword'))

DROP PROCEDURE JAU_SP_Getkeyword

GO

CREATE PROCEDURE JAU_SP_Getkeyword

(

@piMemberID INT

)

AS

BEGIN

select sTitle from JAU_Favouritesearch Group by sTitle

END

GO

Step2: call SP from class file

(1)à Create function in class file

ASP.net Code

'function made by rajesh for search

Public Function findkeyword() As DataSet

Dim objDBManager As New commonlib.Common.DBManager(ConfigurationManager.ConnectionStrings("ConnectionString").ConnectionString)

Dim keywordresult As New DataSet

Dim sSQL As String = "JAU_SP_Getkeyword"

Dim p(0) As SqlParameter

Try

p(0) = New SqlParameter("@piMemberID", _iMemberID)

keywordresult = Objdbmanager.ExecuteDataSet(CommandType.StoredProcedure, sSQL, p)

Dim str As String = Objdbmanager.ErrorMessage

Return keywordresult

Catch ex As Exception

ex = Nothing

End Try

End Function

(2)à Create property in class file

Public Property memberID() As Integer

Get

Return _iMemberID

End Get

Set(ByVal value As Integer)

_iMemberID = value

End Set

End Property

(3)à Declare _MemberID as protected in class file

Protected _iMemberID As Integer

Step3: call function defined in class file in aspx file

Dim objsearch As New Search /*Search here is class file name*/

/* By Below code you can use the data form the database */

'code done by rajesh to find keyword

Dim dskeyword As DataSet

dskeyword = objsearch.findkeyword()

Dim keywordtitle As String = Trim(Request.QueryString("Text"))

For i As Integer = 0 To dskeyword.Tables(0).Rows.Count - 1

Dim str As String = Trim(dskeyword.Tables(0).Rows(i).Item(0))

If str = keywordtitle Then

linkfav.Visible = False

End If

Next

'


Hope this post will help you,
if yes please put comment below of this page,
Rajesh Singh,
Asp.Net Developer
Indianic Infotech Ltd (India)
rajesh@indianic.com
Remove gap between marquee tags


Question: How to remove gap or space between marquee tags ?

Answer :

<html>
<style type="text/css">
img {
width: 200px;
height: 75px;
}
#marqueecontainer
{
position: relative;
width: 200px; /*marquee width */
height: 200px; /*marquee height */
background-color: white;
overflow: hidden;
border: 3px solid black;
padding: 2px;
padding-left: 4px;
}

</style>
<script type="text/javascript">
var delayTime=5
var marqueeSpeed=2
var pauseTime=1
var copySpeed=marqueeSpeed
var pauseSpeed=(pauseTime==0)? copySpeed: 0
var actualHeight=''

function ScrollMarquee()
{
if (parseInt(crossMarquee.style.top)>((actualHeight / 2)*(-1)+8))
crossMarquee.style.top=parseInt(crossMarquee.style.top)-copySpeed+"px"
else
crossMarquee.style.top=parseInt((marqueeheight - (actualHeight / 2)) / 2)+8 +"px"
}

function InitializeMarquee()
{
crossMarquee=document.getElementById("vmarquee")
crossMarquee.style.top=0
marqueeheight=document.getElementById("marqueecontainer").offsetHeight
actualHeight=crossMarquee.offsetHeight;
if (window.opera || navigator.userAgent.indexOf("Netscape/7")!=-1)
{
crossMarquee.style.height=marqueeheight+"px"
crossMarquee.style.overflow="scroll"
return
}
setTimeout('lefttime=setInterval("ScrollMarquee()",30)', delayTime)
}

if (window.addEventListener)
window.addEventListener("load", InitializeMarquee, false)
else if (window.attachEvent)
window.attachEvent("onload", InitializeMarquee)
else if (document.getElementById)
window.onload=InitializeMarquee

</script>
<div id="marqueecontainer" onMouseover="copySpeed=pauseSpeed" onMouseout="copySpeed=marqueeSpeed">
<div id="vmarquee" style="position: absolute; width: 98%;">

<div id="copy1" style="background: red;">
<div><img src="http://www.activemax.com/wp/wp-content/uploads/2008/10/google_sitemap.gif"></div>
<div><img src="http://ebinture.files.wordpress.com/2008/07/google-mobile-logo-copy.jpg"></div>
<div><img src="http://images4.pocket-lint.com/images/2Mlt/google-chrome-internet-browser-review-0.jpg"></div>
<div><img src="http://images.pcworld.com/news/graphics/165679-google_wave_logo_take2_180.jpg"></div>
<div><img src="http://www.coffeecup.com/images/software/icons/google-sitemapper_4.7.1_win_en.png"></div>
</div>

<div id="copy2" style="background: blue;">
<div><img src="http://www.activemax.com/wp/wp-content/uploads/2008/10/google_sitemap.gif"></div>
<div><img src="http://ebinture.files.wordpress.com/2008/07/google-mobile-logo-copy.jpg"></div>
<div><img src="http://images4.pocket-lint.com/images/2Mlt/google-chrome-internet-browser-review-0.jpg"></div>
<div><img src="http://images.pcworld.com/news/graphics/165679-google_wave_logo_take2_180.jpg"></div>
<div><img src="http://www.coffeecup.com/images/software/icons/google-sitemapper_4.7.1_win_en.png"></div>
</div>

</div>
</div>
</html>


Hope this post will help you,
if yes please put comment below of this page,
Rajesh Singh,
Asp.Net Developer
Indianic Infotech Ltd (India)
rajesh@indianic.com
Use of Cursor in Stored Procedure


Wednesday, October 7, 2009

Using below code you can learn, how to use cursor in Stored Procedure

DECLARE @dListingEnddate datetime

DECLARE cur_enddate1 CURSOR FOR( select top 10 dListingEnddate as dListingEnddate from jau_productmaster)

/* Open Corsor */
OPEN cur_enddate1

FETCH NEXT From cur_enddate1 INTO @dListingEnddate

WHILE @@Fetch_Status = 0

BEGIN
/*Put your sql query here*/
--INSERT INTO GK_ShareEvent (iShareEventID,iEventAudienceID)
--VALUES(@iEventID,@iEventAudienceID)

FETCH NEXT From cur_enddate1 INTO @dListingEnddate

END

/* Close Corsor */
CLOSE cur_enddate1

DEALLOCATE cur_enddate1

END


-------------------------------------------------------------------------------------------
Hope this post will help you,
if yes please put comment below of this page,
Rajesh Singh,
Asp.Net Developer
Indianic Infotech Ltd (India)
rajesh@indianic.com

Set IIS server as Default Server to Visual Studio


Monday, October 5, 2009

The ASP.NET Development Server is the default way to run the project from VS 2005.

To run the .net Application from the local IIS, Please follow the step given below.

1 Create Virtual Directory of your application in IIS on your local machine.

2 Go To Website / Start Options from the Menu or right click of project name form solution explorer and go to project property and select start option.

3 Select Start Options in the Tree on the left of the box.

4 Select Use Custom Server

5 Enter the URL of the database on the local box (http://localhost/MyWeb where "MyWeb" is the Virtual Directory.

This will put you back in the standard IIS debug.

This fixed a problem that I was having with the Infragistics controls that I am using.

Hope this post will help you,
if yes please put comment below of this page,
Rajesh Singh,
Asp.Net Developer
Indianic Infotech Ltd (India)
rajesh@indianic.com

Set Default button in Asp.Net


Sometime it happen, that you enter text in textbox and you press enter and some other submit button get pressed, so here is the solution below, using below code you can set your default button.

HTML code

enter your table inside div tag and put onkeypress event in div tag
-----------------------------------------------------------------------------------------

<div id="pnlSearch" onkeypress="javascript:return WebForm_FireDefaultButton(event, 'btnSearch')">


<table width="50%" cellpadding="0" cellspacing="0">

<tr>

<td>

Search :

</td>

<td>

<input name="txtSerach" type="text" id="txtSerach" />

</td>

<td colspan="2">

<input type="submit" name="btnSearch" value="Search" id="btnSearch" />

</td>

</tr>

</table>

</div>
------------------------------------------------------------------------------------------


Put this fuction inside script tag in your web page

------------------------------------------------------------------------------------------
function WebForm_FireDefaultButton(event, target) {

if (event.keyCode == 13) {

var src = event.srcElement || event.target;

if (!src || (src.tagName.toLowerCase() != "textarea")) {

var defaultButton;

if (__nonMSDOMBrowser) {

defaultButton = document.getElementById(target);

}

else {

defaultButton = document.all[target];

}

if (defaultButton && typeof(defaultButton.click) != "undefined") {

defaultButton.click();

event.cancelBubble = true;

if (event.stopPropagation) event.stopPropagation();

return false;

}

}

}

return true;

}
------------------------------------------------------------------------------------------

Hope this post will help you,
if yes please put comment below of this page,
Rajesh Singh,
Asp.Net Developer
Indianic Infotech Ltd (India)
rajesh@indianic.com